Add an administrator account
At this point, the election application doesn't restrict who can nominate a candidate. In this tutorial, you'll create an administrative account to control the actions that can be taken in the election application.
Kadena accounts consist of four parts:
- An account name.
- An account balance.
- One or more public keys that can be used to sign transactions.
- A predicate that specifies how many keys are required to sign transactions.
For this tutorial, you'll create an administrative account with only one key and you'll use the default keys-all predicate. The keys-all predicate requires transactions to be signed by all keys in the account. Because you're creating this account with only one key, only one signature will be required to sign transactions. You can use any text string of three to 256 characters for the account name. However, the convention for accounts that only have one key is to use the prefix k: followed by public key of the account.
For a more general introduction to how public and private keys are used to sign transactions and in Kadena accounts, see Beginner’s Guide to Kadena: Accounts + Keysets.
Before you begin
Before you start this tutorial, verify the following basic requirements:
- You have an internet connection and a web browser installed on your local computer.
- You have a code editor, such as Visual Studio Code, access to an interactive terminal shell, and are generally familiar with using command-line programs.
- You have cloned the voting-dapp repository to create your project directory as described in Prepare your workspace.
- You have the development network running in a Docker container as described in Start a local blockchain.
- You have created a Chainweaver account and are connected to the development network using your local host IP address and port number 8080.
Generate the administrative key pair
There are many tools you can use to create keys, including the Chainweaver application you used in the previous tutorial. In fact, if you followed that tutorial, you already have a public and private key pair that you could use as the basis for your administrative account. However, for demonstration purposes in this tutorial, let's create a new key in Chainweaver and use the new key as the basis for your Kadena account.
To create a new key pair and account:
-
Verify the development network is currently running on your local computer.
-
Open Chainweaver.
-
Select devnet from the network list.
-
Click Keys in the Chainweaver navigation panel.
-
Click Generate Key to add a new public key to your list of public keys.
-
Click Add k: Account for the new public key to add a new account to the list of accounts you are watching in Chainweaver.
If you expand the new account, you'll see that no balance exists for the account on any chain and there's no information about the owner or keyset for the account. For example:
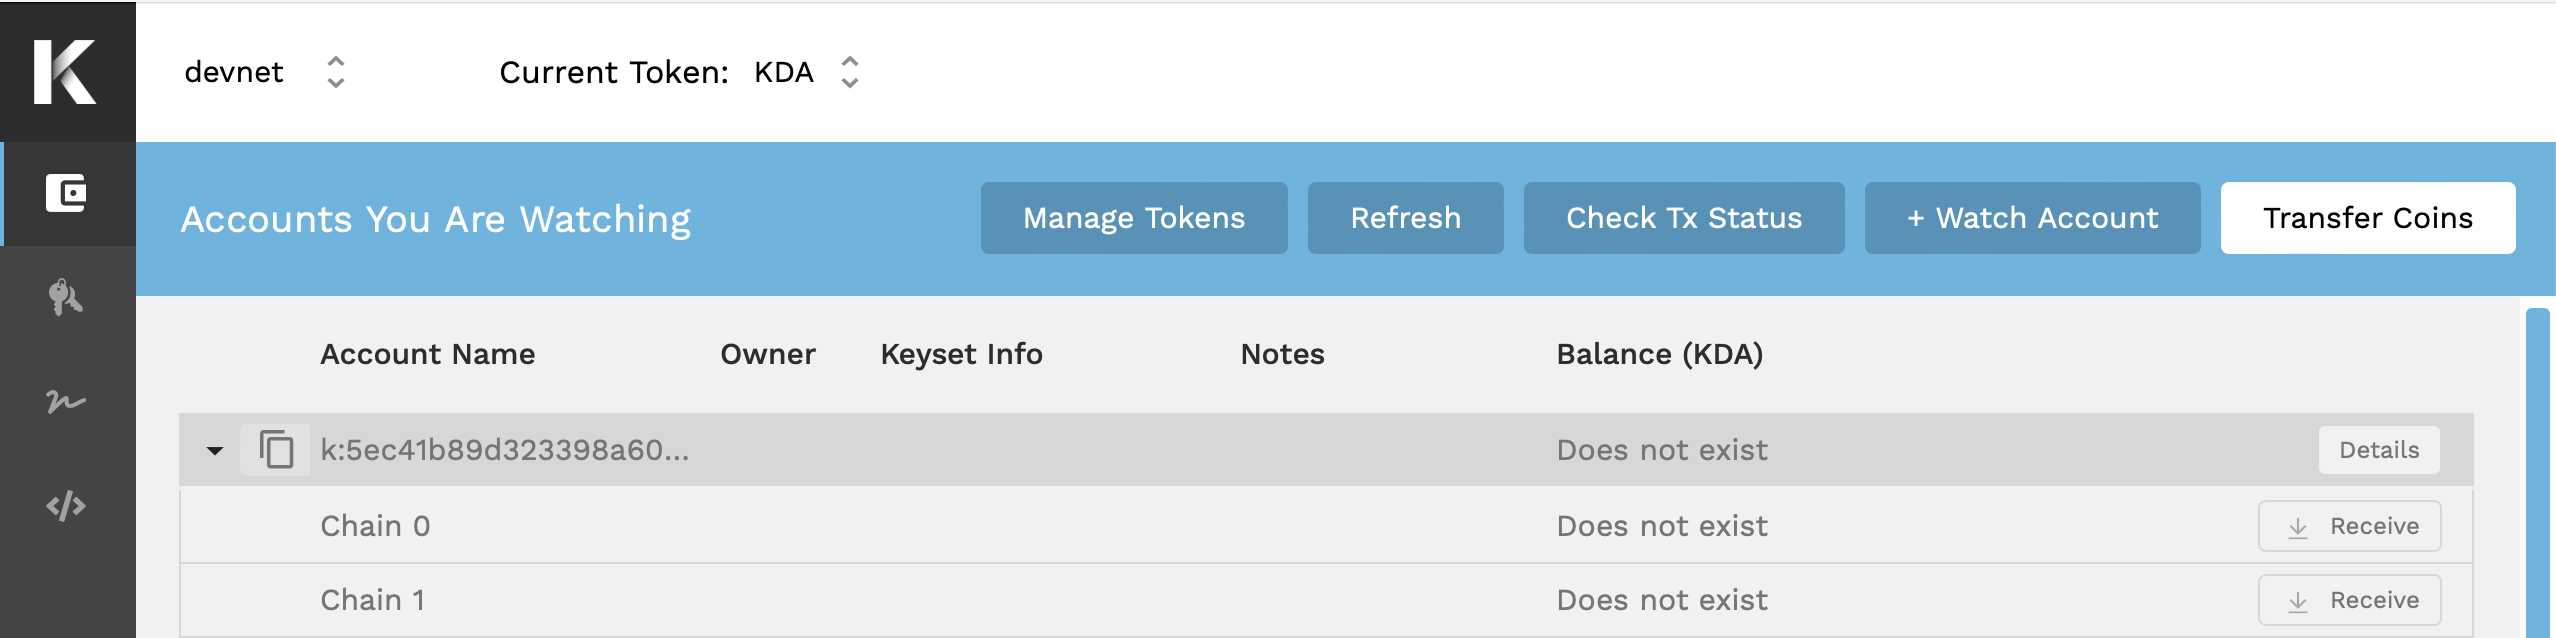
Initial state of a new account In this initial state, the account name acts as a placeholder, but the account doesn't exist yet on the development network.
If you change to the
./snippetsfolder in the election project directory, you can also verify that your account doesn't exist using the Kadena client. For example, you can run thecoin-detailsscript for the administrative account you just added with a command similar to the following:npm run coin-details:devnet -- k:<your-public-key>npm run coin-details:devnet -- k:<your-public-key>Because your account doesn't exist yet on the development network, the script returns an error similar to the following:
type: 'TxFailure', message: 'with-read: row not found: k:5ec41b89d323398a609ffd54581f2bd6afc706858063e8f3e8bc76dc5c35e2c0',type: 'TxFailure', message: 'with-read: row not found: k:5ec41b89d323398a609ffd54581f2bd6afc706858063e8f3e8bc76dc5c35e2c0',
Prepare to create an onchain account
An account must have funds before it can be used on any Kadena blockchain.
To interact with the Kadena main public network (mainnet), you typically buy KDA as a digital asset through an exchange, and then transfer the KDA to the Kadena account you want to fund.
For the Kadena test network (testnet), you can submit a request to transfer KDA to an account for testing purposes using the Kadena Developer Tools.
Prepare to fund an account
To interact with the local development network, you can:
- Create your own faucet contract to fund a test account.
- Provide your account information to someone who can transfer KDA to you.
- Transfer KDA from a public test account with publicly visible private keys.
For this tutorial, you can fund the administrative account that governs the election application by transferring KDA from one of the public test accounts.
Prepare to work with the coin contract
As you saw in Explore default contracts, the development network includes several default smart contracts, including the coin contract.
In this tutorial, you'll use the transfer-create function that's defined in the coin smart contract to transfer 20 KDA from a public test account to your administrative account.
However, transferring coins using functions in the coin contract requires you to interact with Pact types that are defined in the contract.
Before you can transfer coins using the Kadena client scripts in the snippets folder, you need to generate the types required.
To generate the types required to work with the coin contract:
-
Open the
election-dapp/snippetsfolder in a terminal shell on your computer. -
Generate the types by running the following command:
npm run generate-types:coin:devnetnpm run generate-types:coin:devnetThis script uses the pactjs-cli to generate types from the oin contract on the development network. You should see output similar to the following:
> snippets@1.0.0 generate-types:coin:devnet> pactjs contract-generate --contract coin --api http://localhost:8080/chainweb/0.0/development/chain/1/pact Generating pact contracts from chainweb for coinfetching coinfetching fungible-v2fetching fungible-xchain-v1 WARNING: No namespace found for module "coin". You can pass --namespace as a fallback. WARNING: No namespace found for module "fungible-v2". You can pass --namespace as a fallback. WARNING: No namespace found for module "fungible-xchain-v1". You can pass --namespace as a fallback. Creating directory /Users/pistolas/election-dapp/snippets/node_modules/.kadena/pactjs-generatedWriting default package.json to /Users/pistolas/election-dapp/snippets/node_modules/.kadena/pactjs-generated/package.json Verifying tsconfig.json at `/Users/pistolas/election-dapp/snippets/tsconfig.json`> snippets@1.0.0 generate-types:coin:devnet> pactjs contract-generate --contract coin --api http://localhost:8080/chainweb/0.0/development/chain/1/pact Generating pact contracts from chainweb for coinfetching coinfetching fungible-v2fetching fungible-xchain-v1 WARNING: No namespace found for module "coin". You can pass --namespace as a fallback. WARNING: No namespace found for module "fungible-v2". You can pass --namespace as a fallback. WARNING: No namespace found for module "fungible-xchain-v1". You can pass --namespace as a fallback. Creating directory /Users/pistolas/election-dapp/snippets/node_modules/.kadena/pactjs-generatedWriting default package.json to /Users/pistolas/election-dapp/snippets/node_modules/.kadena/pactjs-generated/package.json Verifying tsconfig.json at `/Users/pistolas/election-dapp/snippets/tsconfig.json`Because you're generating types to create an account outside of the context of a particular namespace, you can ignore the
namespacewarnings.
Prepare to run the transfer-create script
Before you transfer coins from a public test account, you should review the script that calls the transfer-create to learn more about how Kadena client libraries enable you to insteract with the Kadean blockchain.
To prepare to run the transfer-create.ts script:
-
Open the
election-dapp/snippets/transfer-create.tsscript in your code editor. -
Review the initial client configuration.
As you can see in the first five lines, the script imports functions from the Kadena client library and imports configuration information from the
configuration.tsfile to create a client for interacting with the blockchain:import { Pact, createClient, createSignWithKeypair, isSignedTransaction } from '@kadena/client';import { PactNumber } from '@kadena/pactjs';import { getApiHost, getChainId, getNetworkId } from './configuration'; const client = createClient(getApiHost());import { Pact, createClient, createSignWithKeypair, isSignedTransaction } from '@kadena/client';import { PactNumber } from '@kadena/pactjs';import { getApiHost, getChainId, getNetworkId } from './configuration'; const client = createClient(getApiHost());You must specify the receiving account—your administrative account name—as an argument when running the script, so the script displays an error message if the argument isn't provided.
if (!process.argv[2]) { console.error('Please specify a Kadena account.');}if (!process.argv[2]) { console.error('Please specify a Kadena account.');} -
Review the sender account information.
As you can see in the next lines, the sender is
sender00. This account is one of the public development network accounts that holds some KDA on all chains. The public and private keys for this account are copied from GitHub.const FUNDING_ACCOUNT = 'sender00';const FUNDING_ACCOUNT_PUBLIC_KEY = '368820f80c324bbc7c2b0610688a7da43e39f91d118732671cd9c7500ff43cca';const FUNDING_ACCOUNT_PRIVATE_KEY = '251a920c403ae8c8f65f59142316af3c82b631fba46ddea92ee8c95035bd2898'; const accountKey = (account: string): string => account.split(':')[1];const FUNDING_ACCOUNT = 'sender00';const FUNDING_ACCOUNT_PUBLIC_KEY = '368820f80c324bbc7c2b0610688a7da43e39f91d118732671cd9c7500ff43cca';const FUNDING_ACCOUNT_PRIVATE_KEY = '251a920c403ae8c8f65f59142316af3c82b631fba46ddea92ee8c95035bd2898'; const accountKey = (account: string): string => account.split(':')[1]; -
Review the
mainfunction.In the remainder of the script, the
mainfunction calls thetransfer-createfunction of thecoincontract with information about the sender, receiver, and the amount to create and fund your administrative account.Inside the
mainfunction, the amount to transfer is converted to aPactDecimalwith the format:{ decimal: '20.0' }.The script then generates the Pact code and creates the transaction for you, based on the typing information generated in Prepare to work with the coin contract and the arguments provided to the function.
The third argument of
transfer-createis a function that returns the guard for the account to be created. To define the guard for the account, the.addData()function uses the public key of the administrative account as the only key andkeys-allas the predicate. This guard associates the public key of your administrative account with the private key you hold in Chainweaver to ensure that only you can control the account.The
.addSigner()function specifies that the sender must sign the transaction to pay the transaction fee—commonly referred to as gas—and to make the transfer with the provided details.In the
.setMeta()function,sender00is specified as thesenderAccount. After setting the networkId from thedevnetconfiguration, the transaction is created. The transaction is then signed with the private key of thesender00account and the transaction is submitted.
Transfer coins to create an account
To transfer coins to fund the administrative account:
-
Verify the development network is currently running on your local computer.
-
Open and unlock the Chainweaver desktop or web application.
-
Click Accounts in the Chainweaver navigation pane, then click the Copy to clipboard icon to copy the account name for your account.
-
Open the
election-dapp/snippetsfolder in a terminal shell on your computer. -
Create and fund your administrative account using the
transfer-createscript by running a command similar to the following with the k: account name for your administrative account:npm run transfer-create:devnet -- k:<your-public-key>npm run transfer-create:devnet -- k:<your-public-key>Replace
k:<your-public-key>with the account name for your administrative account. You can copy this account name from Chainweaver when viewing the account watch list. After a few seconds, you should see output similar to the following:> snippets@1.0.0 transfer-create:devnet> KADENA_NETWORK=devnet ts-node ./transfer-create.ts k:5ec41b89d...5c35e2c0 { status: 'success', data: 'Write succeeded' }> snippets@1.0.0 transfer-create:devnet> KADENA_NETWORK=devnet ts-node ./transfer-create.ts k:5ec41b89d...5c35e2c0 { status: 'success', data: 'Write succeeded' } -
Verify that your account was created using the Kadena client and the
coin-detailsscript for the administrative account with a command similar to the following:npm run coin-details:devnet -- k:5ec41b89d...5c35e2c0npm run coin-details:devnet -- k:5ec41b89d...5c35e2c0You should see information about the new account similar to the following:
{ guard: { pred: 'keys-all', keys: [ '5ec41b89d323398a609ffd54581f2bd6afc706858063e8f3e8bc76dc5c35e2c0' ] }, balance: 20, account: 'k:5ec41b89d323398a609ffd54581f2bd6afc706858063e8f3e8bc76dc5c35e2c0'}{ guard: { pred: 'keys-all', keys: [ '5ec41b89d323398a609ffd54581f2bd6afc706858063e8f3e8bc76dc5c35e2c0' ] }, balance: 20, account: 'k:5ec41b89d323398a609ffd54581f2bd6afc706858063e8f3e8bc76dc5c35e2c0'} -
Click Accounts in the Chainweaver navigation panel.
-
Expand your administrative account to verify that on chain 1 you are the owner, one keyset is defined, and the balance is 20 KDA.

Your funded administrative account on the development network
Next steps
In this tutorial, you learned how to:
- Generate a new public and secret key for a Kadena account using Chainweaver.
- Transfer coins to create and fund a new account using the Kadena client.
- Verify account information using the Kadena client and in Chainweaver.
You'll use the KDA you transferred to the administrative account to pay transaction fees for defining keysets, deploying smart contract modules, and nominating candidates in later tutorials. Before we get there, the next tutorial demonstrates how to create a namespace for a new keyset and smart contracts.